![]()
![]()
Importing DICOM Files Using the Flywheel CLI
Introduction
If you have existing DICOM data you would like to add to Flywheel you can use the Flywheel CLI. The Flywheel CLI reads through directories of files and uses the DICOM header information to group them into the correct Acquisitions, Sessions, and Subjects in Flywheel.
This article explains how to use two commands to import DICOM images: ingest dicom and import dicom.
Requirements
- If using the
ingestcommand, DICOM data must have one of the following file extensions:.dcm,.dcm.gz,.dicom,.dicom.gz,.ima,.ima.gz
See our other import options if you have non-DICOM files.
- Verify you have Read-Write permissions to the Group and Project you are importing the data to.
Instruction Steps
When to Use Import DICOM vs Ingest DICOM Commands
Both import dicom and ingest dicom import DICOM images into Flywheel, but which command you use depends on which Flywheel infrastructure version you are using.
- Follow the ingest DICOM steps if your Flywheel site is using V3 infrastructure.
- Follow the import DICOM steps if your Flywheel site is using V2 infrastructure.
Ingest DICOM
To use the ingest DICOM command to upload data from your computer or from an cloud storage bucket:
Upload Data from your Computer
- Follow these instructions to download and sign in to the Flywheel CLI If you cannot download the Flywheel CLI to your computer, you can upload smaller batches of DICOM files using your web browser.
- Open Terminal or Windows Command Prompt.
- Note the location of the parent folder containing the DICOM files you are importing.
-
The Flywheel CLI allows you to either create a new Flywheel Group and Project on import or use a Group and Project that already exists.
- To create a new Group or Project: Enter a new Group ID and Project Label in the command below.
-
To get information for an existing Group and Project:
- Sign in to your Flywheel account.
- Select the project where you would like to import the DICOM data.
- At the top of the project page, copy the Group ID and Project label.

-
In Terminal or Windows Command Prompt, start with the following command, which includes all of the required information to import the folder:
For example: fw ingest dicom --verbose ~/Desktop/flywheel psychology "Anxiety Study"
Note: If your project label includes spaces, place quotes around it when entering the command.*
- Review the hierarchy and scan summary to make sure it matches what you expect.

Tip: To view where in the Flywheel hierarchy the data will be imported, use the --verbose flag. This also displays if Flywheel will create a new group, project, subject, session, or acquisition container or if it will upload the data to an existing container.
- Enter yes to begin importing.
The Flywheel CLI displays its import progress.
- Once complete, sign in to Flywheel, and view your data.
From a Cloud Storage Bucket
Follow these instructions to upload data from AWS, Google, or Azure to Flywheel.
-
Configure the credentials for your bucket. The Flywheel CLI uses these credentials to access data in the storage bucket, so you must configure them before running the ingest command. The Flywheel CLI does not support passing credential parameters to it. Make sure that the user has read/write access to data in the bucket.
-
AWS: See Amazon's documentation on how to use the configure command to set up your credentials or learn more about creating a shared credentials file or using environmental variables to set up credentials
- Azure: See Microsoft's documentation on how to use the Azure CLI login command to set up your credentials
-
Google Cloud: See Google's documentation on how to use the gcloud auth login command to set up your credentials or learn more about using the other authentication options.
-
Start with the following command:
Populate the relevant information for your data and environment, and add any optional flags. Use the following format for buckets:
- S3:
s3://bucket-name/key-name - Google Cloud:
gs://BUCKET_NAME1/ - Azure:
https://myaccount.blob.core.windows.net/mycontainer/myblob
For example:
Note: If you are using the config file to de-id data, you must include the --de-identify flag.
See the ingest template reference guide for more information on the optional flags.
If you have a have the cluster feature turned on in your Flywheel environment, and the cluster can access your s3 storage, you can use the --cluster <cluster URL> optional flag. This will use the cluster's resources to upload data faster. If you do not have cluster ingest enabled, continue to the next step.
The cluster URL for your Flywheel environment uses this format: https://yourflywheelURL.com/ingests.
For example:
fw ingest dicom --cluster https://university.flywheel.io/ingests s3://MyStudy/DataForUpload psychology "Anxiety Study"
- Copy and paste your command into Terminal or Windows Command prompt, and hit enter. Flywheel CLI displays the data it has found.

-
Review the hierarchy and scan summary to make sure it matches what you expect.
-
Enter yes to begin importing. The Flywheel CLI displays its import progress.
-
Once complete, sign in to Flywheel and view your data.
Import DICOM
Warning
This is an unsupported upload method for site, group, or project de-id profiles.
Use one of these supported methods if you use site, group, or project de-id profiles.
To use the import dicom command:
- Follow these instructions to download and sign in to the Flywheel CLI. If you cannot download the Flywheel CLI to your computer, you can upload smaller batches of DICOM files using your web browser.
- Open Terminal or Windows Command Prompt.
- Note the location of the parent folder containing the DICOM files you are importing.
-
The Flywheel CLI allows you to either create a new Flywheel Group and Project on import or use a Group and Project that already exist.
- To create a new Group or Project: Enter a new Group ID and Project Label in the command below.
-
To get information for an existing Group and Project:
-
Open Chrome, and sign in to your Flywheel account.
- Select the project where you would like to import the DICOM data.
- At the top of the project page, copy the Group ID and Project label.
- In Terminal or Windows Command Prompt, enter the following command to import the folder:
For example:
fw import dicom --skip-exisiting ~/Desktop/flywheel psychology "Anxiety Study" --skip-exisiting
Note: If your project label includes spaces, place quotes around it when entering the command.
-
Add any additional optional flags for the ingest command, including creating a config file to tell the Flywheel CLI how to import, organize, and de-identify your data. See the article to learn more how to create a config file for your data.
-
Flywheel CLI displays the data it has found and notes where it will import the files. It also notes if the Flywheel CLI will create a new container or use an existing container for the files.
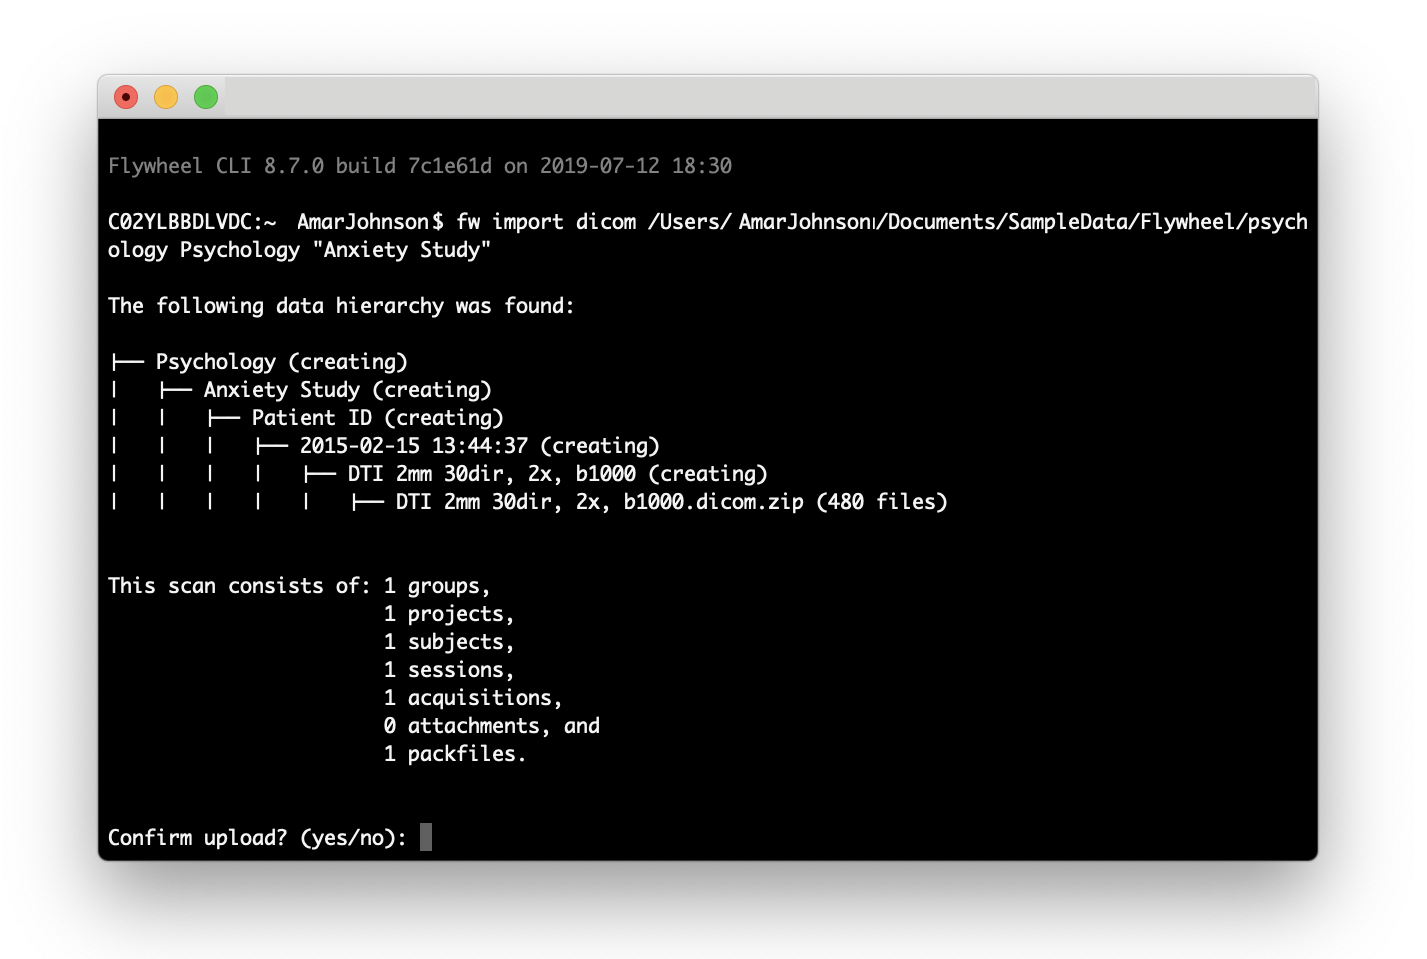
- Review the hierarchy and scan summary as shown above to make sure it matches what you expect.
Where are my DICOM files? The Flywheel CLI takes the related DICOM files and groups them in to single a zip file with the extension dicom.zip. In the scan summary, this is called a packfile. The Flywheel CLI imports the dicom.zip file to the Acquisitions tab.
- Enter yes to begin importing. The Flywheel CLI displays its import progress.

- Once complete, sign in to Flywheel, and view your data.
Additional Examples and Troubleshooting
De-identify Data Prior To Entering Flywheel
If your data hasn't already been de-identified, you can use the default de-id option in the CLI. This flag removes the DICOM tags PatientID, PatientName, and PatientBirthDate.
An example command:
The Flywheel CLI also gives you the option to create custom de-identification configurations. See the article to learn more about how to create a customized de-id profile.
Troubleshooting
Use the debug flag to see which data isn't being imported. For example:
For example, the following output shows that some of the DICOM files are zipped, so the import dicom command can't import the files:
DEBUG: CLI Version: 8.7.0
DEBUG: CLI Args: ['/Users/exampleUser/.cache/flywheel/python-3.6.6/lib/python3.6/site-packages/flywheel_cli/main.pyc', 'import', 'dicom', '--debug', '--audit-log-path', '/Users/exampleUser/Documents/AuditLogs/AuditLog', '/Users/exampleUser/Documents/SampleData', 'example', 'project']
DEBUG: Platform: Darwin-18.7.0-x86_64-i386-64bit
DEBUG: System Encoding: UTF-8
DEBUG: Python Version: 3.6.6 (default, Jul 17 2018, 08:21:56)
[GCC 4.2.1 Compatible Apple LLVM 7.0.2 (clang-700.1.81)]
DEBUG: SDK Version: 8.2.0
DEBUG: Flywheel Site URL: https://dev.flywheel.io:443/api
DEBUG: Using source filesystem: osfs:///Users/exampleUser/Documents/SampleData
**DEBUG: Ignoring non-DICOM file: Flywheel/fwtest/AmygdalaStructure/amyg\_s4/amyg\_s4\_amyg\_sess1\_pcolA/DTI 2mm 30dir 2x b1000\_0/8892\_14\_1\_dti.dcm.zip****DEBUG: Ignoring non-DICOM file: Flywheel/fwtest/AmygdalaStructure/amyg\_s11/amyg\_s11\_amyg\_sess2\_pcolA/test/10+cmrr\_mbepi\_task-spatialfrequency\_s6\_2mm\_66sl\_PA\_TR1.0.dicom.zip****DEBUG: Ignoring non-DICOM file: Flywheel/psychology/Anxiety Study/anx\_s2/anx\_s2\_anx\_ses1\_protA/DTI 2mm 30dir 2x b1000/8892\_14\_1\_dti.dcm.zip****DEBUG: Ignoring non-DICOM file: Flywheel/psychology/Anxiety Study/anx\_s4/anx\_s4\_anx\_ses1\_protA/DTI 2mm 30dir 2x b1000/8892\_14\_1\_dti.dcm.zip**