![]()
![]()
Find Data in Flywheel
Introduction
Welcome to Flywheel! If you're new to using Flywheel, you may have been given access to a dataset by a collaborator. When adding your data to a project, you should check to make sure the data is uploaded correctly or to verify the quality of images.
Instruction Steps
This article explains how to find that data and start doing science.
- In your browser, go to your institution's Flywheel site. For example:
https://University.Flywheel.io
 2. Sign in to Flywheel.
Use the email your site administrator used to create your account. Contact your site administrator if you do not know which option to use. 3. Once you are signed in, your Flywheel projects appear. Flywheel projects contain the information and data used in studies and trials. See our article if you want to learn more about how Flywheel organizes data.
Tip 1
Don't see any projects?Your site admin needs to give you permission to a project to be able to view it.
Find Your Data in Flywheel
You can find your data a few different ways:
* [Use search to locate a session](#)
* [Navigate to the project where the session was uploaded](#)
Tip 2
Where are my images in Flywheel?Flywheel places images under Acquisitions. To learn more about how Flywheel organizes data, see our article.
Use Search to Locate your Data
Flywheel searches across all projects you have permissions to access, and because Flywheel search uses fuzzy matching, you only need to know a little bit of information about the data to find what you are looking for.
- To search, type a search string in the Search Box on the left sidebar
Tip 3
Tip: Hit enter on the blank search bar to bring up all data you have access to in Flywheel. 2. Use the filters to narrow down the data you are looking for. For example, if you know you uploaded the data within the last few days, go to Session Timestamp, and adjust the range.
Tip 4
Tip: See our article on search to learn more about how to use filters and for more examples of searching in Flywheel. 3. If you want to view an image to check the quality:
1. Click the **Files** tab
2. Select the action menu and select view 

The viewer opens with the image series. The Flywheel viewer allows you to annotate and report on images in 2D (slices). For more information on how to use the features in the viewer, see the viewer's documentation from the Open Health Imaging Foundation
Go to Your Project to View Data
If you know which project you uploaded data to, you can view your image there:
- Click on a Project.
The Project description page appears.
- Click the Sessions tab in the top menu.
In Flywheel, the Sessions tab shows a subject’s visit or the exam performed for the project. For example, a single time in the MRI scanner for a subject.

Tip 5
Group data by subject To organize the data in your project by subject instead of session, click Subject View  . To learn more about the subject view, see our article.
- Select a session.
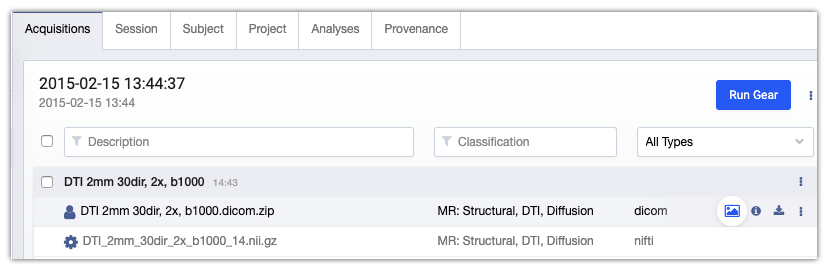
All images associated with that subject and project appear in the acquisitions tab.
- Hover over an acquisition. The image icon (
 )appears.
 5. Click .
The viewer opens with the image series. The Flywheel viewer allows you to annotate and report on images in 2D (slices). For more information on how to use the features in the viewer, see the viewer's documentation from the Open Health Imaging Foundation
What's Next?
Note
Prefer to learn about Flywheel through a video? See our intro to Flywheel video for a complete walkthrough of important Flywheel concepts and how to do the most common tasks. Now that you have your data in Flywheel, you can: