![]()
![]()
Importing Data Overview
Introduction
The first step for any new project in Flywheel is to import your imaging data, so you can organize your data, automate processing, and collaborate with other researchers. Flywheel offers three different methods for importing imaging data:
- Flywheel Connector (also known as the Flywheel Reaper): Connects to an imaging machine to upload data directly to Flywheel. Learn more.
- Flywheel Console: Drag and drop datasets under 200 MB directly to a Project. Learn more.
- Flywheel command-line interface (CLI): Imports larger datasets through the terminal or console on your computer. Learn more.
All of these options get data in to Flywheel. However, the import method you can use depends on the type of data you have, the size of your dataset, and the resources available to you.
This article gives an overview of each of the options for importing data as well as steps for determining which method is best for your type of data.
Instruction Steps
Comparison overview
Below is a comparison of the import options. See the sections below for more information on the options.
Prefer videos?
We have a collection of videos showing you how to get the most out of Flywheel. See these for more information:
See all Flywheel webinars and videos.
| Flywheel Console | Connector | DICOM (CLI) | PAR/REC (CLI) | BIDS (CLI) | Folder (CLI) | Template (CLI) | Bruker (CLI) | |
|---|---|---|---|---|---|---|---|---|
| Options for de-identifying data | X | X | X | X | X | X | X | X |
| Reads file header to automatically place data in the correct Flywheel container and pull out metadata | X | X | X | X | X | X | ||
| Handles over 200 MB of data | X | X | X | X | X | X | X | |
Supports .dcm, .dcm.gz, .dicom, .dicom.gz, .ima, .ima.gz | X | X | X | X | X | |||
| Bulk Ingest available for improved stability | X | X | X | |||||
| Requires a structured directory | X | X | X | X |
The Flywheel Connector
The Flywheel connector (formerly known as the Flywheel Reaper) moves data from an imaging device directly to Flywheel.
Connectors are unique to the site they are configured for. Contact your Flywheel Site Admin for more information about how to set up your session to automatically upload data from your imaging device to a project in Flywheel.
See the following article for more information on the connector:
If your data was uploaded by a connector review this article for tips on finding your data in Flywheel.
The Flywheel Console
The Flywheel Console is the web application where you can view your data. Use this option for a quick way to upload smaller datasets (about 200 MB per upload). There are a couple ways to upload data in the Flywheel console:
-
Upload DICOM: The DICOM uploader allows raw, uncompressed DICOM data to be added to projects. Flywheel reads the DICOM header information to fill out the appropriate metadata fields. Flywheel reads the header information to automatically group sessions and enter metadata in to Flywheel. See below for more details.
-
Add New Acquisition: Allows you to upload any filetype to Flywheel. This option does not evaluate data or read header information, so you must manually classify and add any metadata. See below for more details.
Upload DICOM
The DICOM uploader allows raw, uncompressed DICOM data to be added to projects. Flywheel reads the DICOM header information to fill out the appropriate metadata fields. To use the uploader:
For optimal performance, limit uploads to 10,000 DICOM files -or- 200 MB per upload.
- Sign in to Flywheel.
- In the left menu, click Upload DICOM.
The Upload page appears. - Choose to upload to an existing project, or create a new project.
One must be a Site Admin to create new projects 4. Select files to upload. The uploader does NOT support folders or zipped files. The uploader supports the following filetypes:
* .dcm, .dcm.gz
* .dicom, .dicom.gz
* .ima, .ima.gz
- Review the upload information, and edit the session label, subject label, time, or acquisition label if you wish to use different labels inside Flywheel or if your data is missing a field.

- Enable De-Identify Data if you wish to remove the PatientID, PatientName, and PatientBirthDate fields from the data in Flywheel. This also converts the PatientAge to months.
- Click Upload Data.
Add New Acquisition
Unsupported upload method for site, group, or project de-id profiles
Use one of these supported methods if you use site, group, or project de-id profiles.
If you have non-DICOM data you want to upload to Flywheel, such as you can create a new acquisition in Flywheel. To manually create a new acquisition:
- Sign in to Flywheel.
- Go to the Project where you would like to upload the data.
- Click the Sessions tab.
- You can create a new session or upload to an existing session.
To create a new session and add an acquisition:
1. Go to the **Actions** menu, and select **Create New Session**.
2. Enter information about the session, and click **Submit**.
3. Select the new session, and click the Acquisitions tab.
4. Click **Add New Acquisition**.
5. Enter a description.
*The uploader appears once the description is entered.*
6. Add files, and choose the filetype.
7. Select **Upload**.

To add a new acquisition to an existing session:
1. Select the session.
2. Click the Acquisitions tab.
3. Select the options menu .
4. Choose **Create New Acquisition - Upload Data**.
5. Choose to upload to an existing acquisition or create a new acquisition.
6. Enter a description.
*The uploader appears once the description is entered.*
7. Add files, and choose a filetype.
8. Click **Upload**.

CLI
The Flywheel CLI is the best way to import large amounts of historical data in to Flywheel. For example, if you have been using XNAT in the past to store data, but now you want all of your imaging data in Flywheel, use the CLI to bulk move the data. Each command for importing is designed for different filetypes or directory structures.
Evaluate the data you are importing. Which of these scenarios best describe your data? My data is:
- DICOM and PAR/REC files
- Organized in the BIDS or Bruker standard
- Organized like the Flywheel hierarchy
- A mix of filetypes and file formats
DICOM and PAR/REC files
If you have folders that include DICOM and PAR/REC files, you can use the corresponding commands. The DICOM and PAR/REC commands can be used on directories that include other file types. The Flywheel CLI searches for the .dcm or the .par and .rec file extensions and adds just those files to Flywheel.
Use ingest commands if you have site, group, or project de-id profiles
Learn more about the supported methods if you use site, group, or project de-id profiles.
| Import | Ingest |
|---|---|
| import DICOM command | ingest DICOM command |
| import PAR/REC command | This functionality has not been ported over to the ingest command yet |
Ingest vs Import commandsThe import command will be deprecated in a future release. There is currently no set end-of-life date for the import command. However, we are focusing future development on the ingest command, which offers greater speed, performance, and stability. We will continue to support all import commands as we port functionality to ingest; however, we recommend using the ingest commands when possible.
Your Data Follows BIDS or Bruker Standard
The second type of import options rely on a standard directory structure to place data in the correct location in Flywheel. For example, the bids and bruker commands use the industry standard directory structure for those data types.
To learn more about how to use these commands, see the following articles:
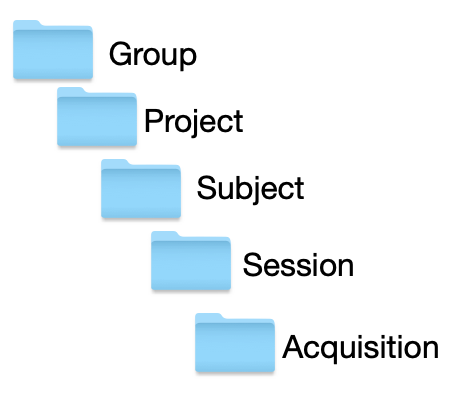
Your Directory Follows the Flywheel Hierarchy
The folder command should be used if you are importing data that you previously downloaded from Flywheel, or if you are importing data that was shared from another Flywheel site. The folder command relies on your folder directory to match the hierarchy within Flywheel. The folder command does not evaluate data before placing them, so it just places the data in a Flywheel location based on where the data appears in the directory.
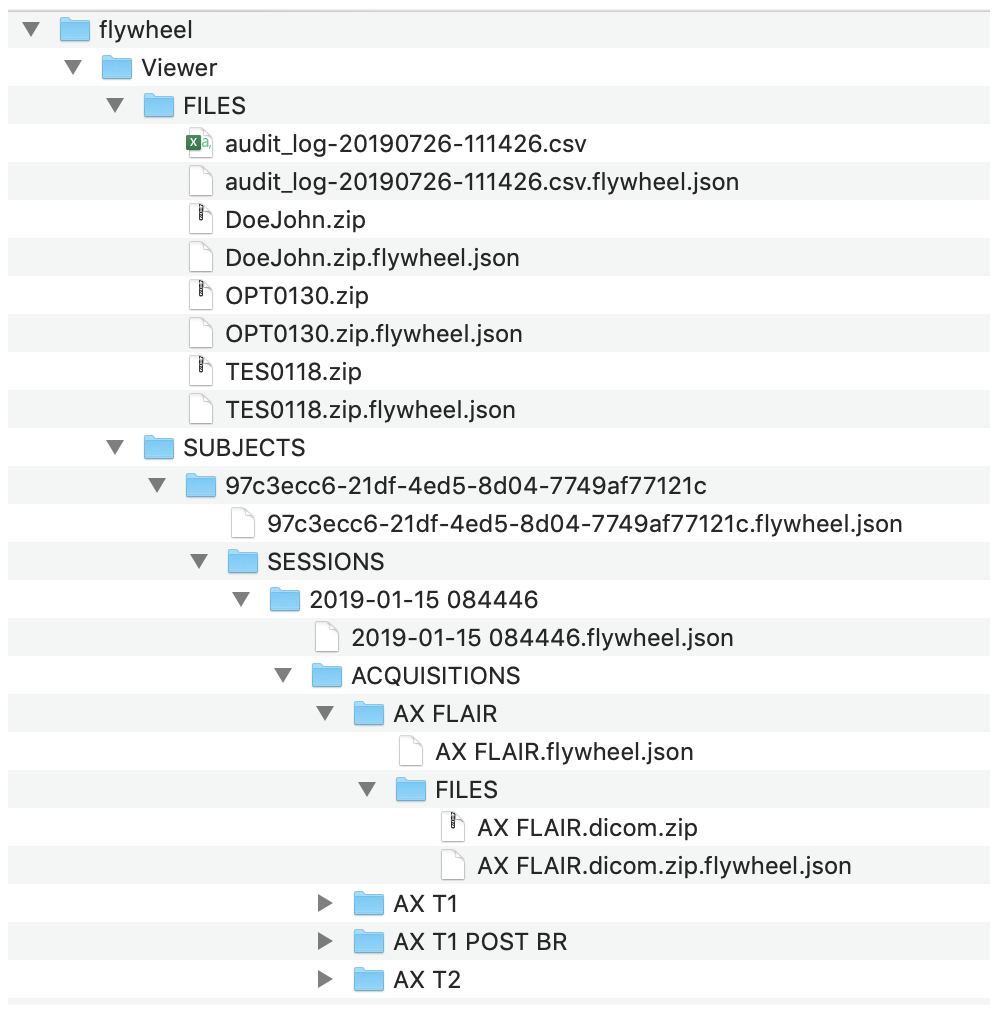
Below is an example of the required directory structure for the folder command:
| Flywheel Hierarchy | Example directory for folder import |
 |  |
See these articles for directions on how to use the folder command:
Ingest vs Import Commands
iImport folder is not a supported upload method for site, group, or project de-id profiles
Use ingest folder instead. Learn more about the supported methods if you use site, group, or project de-id profiles.
Directories are a mix of file formats
If your directories are a mix of file formats and do not follow a standard structure described above, you can use the template to set rules for how to import data.
Import template is not a supported upload method for site, group, or project de-id profiles
Use ingest template instead. Learn more about the supported methods if you use site, group, or project de-id profiles.
Invalid Characters
List of invalid characters that will result in blocked uploads via the CLI or DICOM uploader if they are included in a filename:
- ~
- :
- *
- ?
- “
- <
- |
- \
- /
- Tab
- Line feed
- Carriage Return
- Vertical Tab
- Form Feed