![]()
![]()
Project Exports
Introduction
Use Project Exports to export files from Flywheel to a number of different types of external storage for further analysis or processing.
This feature is a replacement for the Flywheel sync command in the CLI.
External storage can take the form of cloud object storage from a number of vendors or a file system mounted in the Flywheel cluster. Export will transfer files as well as provide a log file.
A prerequisite is for your site to have external storage destinations configured by a Site Admin for you to use this feature.
A Site Admin can connect your external storage to Flywheel, and then you can export files from your project to the storage.
Instruction Steps
Follow these initial steps to start a new project export.
- Sign in to Flywheel. Note: You must have admin permissions for the project you are exporting.
- Go to your project and select the options menu, and choose Exports.
- Click the New Export button
Now we will go through the steps to configure the export.
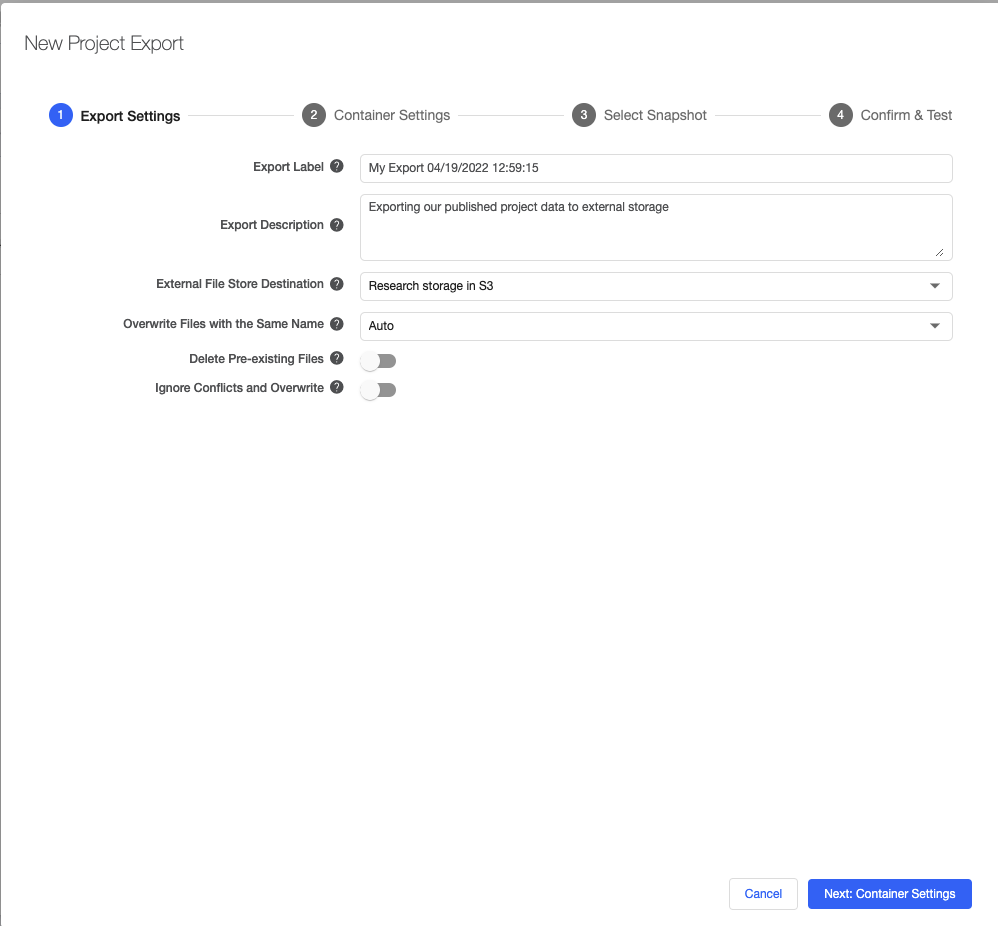
Step 1 Export Settings.
In this step we will set overall export settings and behavior.

The following settings can be configured at this step.
- Export Label: Provide a unique label so that you can identify your export run.
- Export Description: Provide a more detailed description of the resulting export data.
- External File Store Destination: Select one of the configured External Storages for your Export. Note: If you do not see any external file store destination options in the dropdown, ask your Flywheel Site Admin to add external storage providers.
- Overwrite File with Same Name: Select your desired option for handling existing files in the export destination that have the same path as the planned export.
Auto: The timestamps of the files are compared and the one that is most current is either exported to or kept on the destination.
Never: Existing files on the destination with the same path are never overwritten
Always: Existing files on the destination with the same path are overwritten
* + - **Delete Pre-Existing Files**: In some cases you may already have files in the path on the destination.  Activating this means that only files defined in the current export will exist on the destination and other files will be removed from the destination.

- **Ignore Conflicts and Overwrite**: By default the export process checks for overlapping paths with other exports and will not overwrite, to avoid impacting existing exported data.  Activating this overrides this control and allows multiple exports on overlapping storages.-
Click Next, to continue to the next step, or Back to make any corrections to previous steps.
Step 2 Container Settings
First we have the option to select the Container Level for the files we wish to export. The default is the Acquisition level, but you can choose any of Project, Subject, Session, or Acquisition .

Next the Default Destination Path field provides the option to define a template for the destination path for the files. The default will use the standard hierarchy labels to create the path:
{project.label}/{subject.label}/{session.label}/{acquisition.label}/{file.name}
Optionally, you can customize the path by replacing the text in the path. You can enter fixed text, use other fields to define the path, shorten the path by deleting containers, or lengthen the path by adding fields. For example this would be a valid path template:
my_data/{project.label}/{subject.mlset}/{subject.label}/{acquisition.label}/{file.name}
Next, configure how you want ZIP files to be handled. This is important for dicom files, since Flywheel store these as ZIP files.

- Un-Zip: Unzips any zipped files on export
- Zip naming: Options for handling the unzipped file path in the extract to allow collapsing the path.
Original- use the path and the name as it was archived
Underscore - convert the path + filename into a filename using underscores
Basename- ignore the path and just use the file name from the archive
Example: for the archive file: /data/iamge/3D/rfMRI_REST.dcm
Original: /data/iamge/3D/rfMRI_REST.dcm
Underscore: data_iamge_3D_rfMRI_REST.dcm
Basename: rfMRI_REST.dcm
Next, you can define filters to select files you want to export to the destination. If filters are left blank, all files will be exported. Filters can involve fields, as well as logical operations. In addition, regex can be used in the filters. See the section on Filter Details for more information.
In the example below, only DICOM files from subjects within the Training mlset are exported.

Step 3 Select Snapshot
The export is created based on a snapshot of the state of the project data in Flywheel. This helps ensure the content of the export is repeatable and consistent. Create a new snapshot of the current state of the project, or choose an existing snapshot from the list if you want to reproduce an export from a prior run. If you are creating a snapshot, it will be created once you click Next: Confirm Export.
Step 4 Confirm & Test
In this final step confirm your selections for the export. Click Run Dry-Run to perform a short test of the export. This test will not export any data, but you will be able to review 100 rows as if they were exported. Once complete, verify that the correct files are being exported and that they are properly named on the destination. Hover over longer names to view the full name. 
If you are satisfied with the dry run, and have confirmed the settings, click Begin Project Export.This will start the export and it will execute in the background.The walkthrough closes and you should land on the Project Exports list and see your Project Export In Progress.
The Project Export List
The Project Exports page shows a list of all export runs related to the project. From here you can check on the status of any export, cancel exports (under certain conditions), rerun an export, or copy an export to make modifications.
- Click on the In Progress icon to view details about the progress.

- Cancel, Rerun, or Copy an export using the icons to the right on each export in the list:

Cancel is only possible when an extract is Pending or Running.

Rerun will start the export immediately, will all the same settings. It will show up in the list as a new execution.
Copy will create a new export, duplicating the settings of the copied export . You will walk through New Project Export workflow, allowing you to review and modify the settings for this new export. The Export Label will have a time stamp appended, so that it remains unique. You may need to edit it to stay within the 44 character limit.
Additional details on Filtering Rules
Rules allow configuring the export behavior via filtering and path templating.
Each rule is tied to a Flywheel hierarchy level and can optionally have a list of include and/or exclude filters.
Rules are evaluated in order and for every file, the first rule is going to be used where
- the rule
levelmatches the file level and - any on the
includefilters matches (if given) and - none of the
excludefilters match (if given)
Files not matching any of the rules are going to be skipped.
Filters are strings in the form <field> <operator> <value>.
Supported operators and types:
| Op | Description | Types |
|---|---|---|
=~ | regex match | str |
!~ | regex not match | str |
= | equal | str,int,float,datetime |
!= | not equal | str,int,float,datetime |
< | less | int,float,datetime |
> | greater | int,float,datetime |
<= | less or equal | int,float,datetime |
>= | greater or equal | int,float,datetime |
Additional Details on Fields
| Supported Fields for Filter | Available in Path? |
project._id | Yes |
project.label | Yes |
subject._id | Yes |
subject.label | Yes |
subject.firstname | Yes |
subject.lastname | Yes |
subject.sex | Yes |
subject.mlset | Yes |
subject.info.* | Yes |
subject.tags | No |
session._id | Yes |
session.uid | Yes |
session.label | Yes |
session.age | Yes |
session.weight | Yes |
session.operator | Yes |
session.timestamp | Yes |
session.info.* | Yes |
session.tags | No |
acquisition._id | Yes |
acquisition.uid | Yes |
acquisition.label | Yes |
acquisition.timestamp | Yes |
acquisition.info.* | Yes |
acquisition.tags | No |
file.name | Yes |
file.type | Yes |
file.modality | Yes |
file.size | Yes |
file.info.* | Yes |
file.tags | No |
file.classification | No |
file.classification.* | No |
What to Expect at the Storage Destination
After the export is started, files will start to populate the external storage according to the configuration (path template, filters, etc.). Once files are compete, a log file will be placed at the root of the path. The log file is named after the export ID, for example:
The log file is a csv file that contains the source path, destination path, and status of each file that was transferred.
Yes