3D segmentations
The V3 viewer provides a significantly enhanced experience for 3D segmentations. Images can be segmented across different planes and multiple regions of interest (ROIs) can be saved or exported as a single DICOM SEG file.
Definitions
A segmentation refers to a set of regions of interest (ROIs). Multiple segmentations can be loaded (as a DICOM SEG file or a DICOM RTSTRUCT file) or created in the viewer simultaneously. Each segmentation can contain up to 255 ROIs. Multiple segmentations cannot be saved in one single file.
A region of interest or ROI refers to a set of pixels (or "voxels") in an image dataset that can span multiple images slices (also referred to as "Volume of Interest" or "VOI"). Users are able to create 3D ROIs in the viewer to identify/quantify specific structures in the image. ROIs from the same segmentation cannot have overlapping pixels.
Create a new segmentation
-
In the Viewer, click on the segmentation icon at the bottom of the right-side toolbar. This opens the segmentation panel.

-
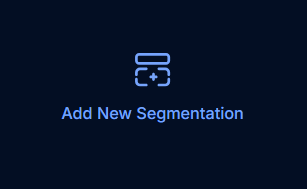
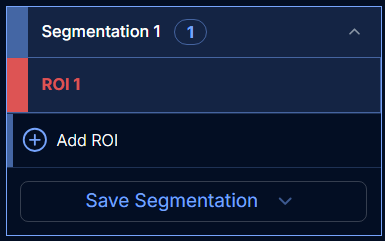
Click on "Add new segmentation" to create a new segmentation. This creates a new segmentation with one ROI.
-
Select one of the ROI tools (brush tool, threshold tool or shapes tools) and start drawing the area of the image that needs to be segmented.

-
Switch to a 2D MPR layout to draw and visualize ROIs on other orientation planes.

-
Create a new ROI by clicking the "Add ROI" button, and start drawing to assign pixels to the new ROI.

-
Visualize your ROIs in 3D by selecting an advanced layout that includes a 3D viewport (e.g. "3D Primary").

Load an existing segmentation
The V3 viewer supports loading two different formats of segmentation files: DICOM SEG (SOPClassUID = 1.2.840.10008.5.1.4.1.1.66.4) and DICOM RTSTRUCT (SOPClassUID = 1.2.840.10008.5.1.4.1.1.481.3). Those can be loaded into the viewport from an acquisition file or from an analysis file. Multiple segmentation files can be loaded simultaneously in the viewer.
Loading from an acquisition file
Segmentations files from acquisitions are shown in the left-side study browser and can be identified by their name and type (SEG or RTSTRUCT). They can only be loaded in the viewport if their reference image series has also been loaded in the left-side study browser. The reference image series of a segmentation file is an image series with a SeriesInstanceUID (0020,000E) that matches the SeriesInstanceUID found in the ReferencedSeriesSequence (0008,1115) of the segmentation file.
DICOM SEG files can be edited and saved back under the same format. DICOM RTSTRUCT files can only be viewed and cannot be edited or saved.

Steps to load a segmentation file from an acquisition into the viewer:
-
Either drag and drop the segmentation thumbnail from the left-side study browser into the viewport or double click on the segmentation file thumbnail to open the segmentation file. If the reference image series for the segmentation is not already loaded in the viewport but is available in the left-side study browser it automatically gets loaded into the active viewport. If the reference image series for the segmentation cannot be found, the segmentation file cannot be loaded.
-
Upon loading, the segmentation panel on the right side automatically opens and all ROIs in the segmentation file are listed along with their label and color.
-
Click on one ROI to display its pixel data. The active viewport will jump to the slice containing the ROI's pixel data. If that ROI has pixels on multiple slices it will jump to the slice representing the center of that ROI.
Loading from an analysis file
Segmentation files from analyses can also be loaded into the viewer. However, since analyses files cannot be edited any edit that is made to a DICOM SEG file coming from an analysis will be saved as a new acquisition DICOM SEG file.
Steps to load a segmentation file from an analysis into the viewer:
-
Click on the "Load Analysis Files" next to the session name in the left-side study browser to open the analysis files browser menu

-
In the browser window, select the segmentation files that you would like to load into the viewer and click "Load into Viewer".

-
The analyses files are then loaded into the left-side study browser, and can be dragged and dropped into a viewport or double-clicked to open them.

Segmentation tools
There are a few different tools that can be used to create and edit ROIs. Each tool is described in further detail below.
Brush tool
The brush tool is the most commonly used tool for segmentation. It allows to manually draw on the image by clicking and dragging. The brush tool can be either 2D (circle) to draw on a single image slice or can be 3D (sphere) in which case painting on one image slice will also draw on the neighboring slices.
The radius of the circle or the sphere can be set in millimeters or in pixels — see Brush size unit and range. It can be changed with a slider in the segmentation panel or with the hotkey Ctrl + mouse wheel.
The brush tool adds pixels to the active ROI in the segmentation panel. If it used over an existing ROI from the same segmentation, it reassigns the pixels to the active ROI.

Brush size unit and range
You can set the brush radius in millimeters (mm) or in pixels (px). The same setting applies to the brush, eraser, and threshold tools, and the unit and size you select are preserved when you switch between those tools. Brush size adjustments use fine, consistent increments to improve precision when creating segmentations.
-
Millimeter mode. The available range adjusts automatically as you switch viewports to reflect each image's pixel spacing. This keeps the brush at a usable size whether you are segmenting a large CT or a high-resolution image.
-
Pixel mode. The minimum brush radius is 1 pixel. Pixel mode is useful for high-resolution images such as optical coherence tomography (OCT), where the pixel spacing is much smaller than the millimeter minimum and accurate segmentation requires drawing at the pixel level, or for images missing pixel spacing information.
Shapes tools
The shapes tools allow to draw different 2D (circle, rectangle) and 3D (sphere) shapes on the image effectively assigning the pixels inside the drawn shape to a ROI. If the shapes tools are used over an existing ROI, it assigns the pixels to the new ROI.
- Circle
A circle can be drawn by left-clicking anywhere in the image and holding down the left click to increase the radius of the circle by dragging the mouse away from that point while holding down the left click. Upon releasing the left-click all pixels within the circle will be assigned to the ROI of the selected image.
- Rectangle
A rectangle can be drawn by left-clicking anywhere on the image to define a corner and then dragging the mouse away from the corner while holding down the left click to create the rectangle. Upon releasing the left-click all pixels inside the rectangle are assigned to the selected ROI.
- Sphere
A sphere can be drawn by left-clicking anywhere on the image to define the center of a circle dragging the mouse away from that point while holding down the left-click in order to increase the radius of the circle. Upon releasing the left-click a circle is automatically drawn on the current image slice and circles of decreasing radius are automatically drawn on subsequent slices on both sides of the current slice. All pixels within all circles is assigned to the selected ROI.

Threshold tool
The threshold tool is similar to the brush tool except that a threshold is set for the value of the pixels that get assigned to the ROI. The threshold tool can be either 2D (circle) or 3D sphere). By default the threshold tool is 2D circle. Users can change the shape to be a 3D sphere. Users can manually paint a region of the image by clicking on the image and dragging the mouse.
The radius of the threshold tool follows the same sizing model as the brush — see Brush size unit and range. It can be changed with a slider in the segmentation panel or with the hotkey Ctrl + mouse wheel.
There are two options to set the threshold:
- Range
The threshold range can be set manually by typing in the minimum and maximum pixel intensity values. Only pixels with values within the threshold range are assigned to the selected ROI.
- Dynamic
Only pixels with values within close range of the value of the pixel at the center of the brush are assigned to the selected ROI.

Eraser tool
The eraser tool allows to manually remove pixels from a ROI by clicking on the image and dragging the mouse over any existing ROI. The eraser tool removes pixels from all ROIs irrespective of what ROI is selected in the measurement panel.
The eraser tool can be either 2D (circle) to erase on individual image slices or can be 3D (sphere), in which case erasing on one image slice will also erase on the neighboring slices.
The radius of the eraser follows the same sizing model as the brush — see Brush size unit and range. It can be changed with a slider in the segmentation panel or with the hotkey Ctrl + mouse wheel.

One-click segmentation tool (beta version)
The one-click segmentation tool is a powerful tool that uses a growcut algorithm to segment 3D volumes with a single click.
To segment a 3D volume with the one-click segmentation tool:
- Select the one-click segmentation tool in the segmentation panel.
- Hover over the region to segment on the image. Hold the mouse still for half a second until you get visual feedback from the mouse cursor to indicate whether the region can be segmented.
- If the visual feedback is negative ("forbidden" icon), try moving the mouse to a different pixel of the region to segment, or even a different slice.
- Once the visual feedback is positive ("plus" icon), this indicates that the region can be segmented. Click once to create the segmentation.
- Review the 3D segmentation that was generated. Make adjustments using the brush or the eraser tool if needed.
Tip
The tool works best on well-defined regions of interest with high contrast near the regions borders.
Warning
The undo/redo functionality is not yet available with the one-click segmentation tool.
Slice interpolation
The slice interpolation functionality fills in segmentations between skipped slices. The tool can be used in any orientation.
- Ensure that pixels were drawn for the same ROI on at least two different, non-consecutive slices.
- With the correct ROI active, select the slice interpolation tool from the segmentation panel and click "Run".
- Review the segmentation on all slices and make adjustments with the brush or the eraser tool if needed.
Warning
The undo/redo functionality is not yet available with the slice interpolation.
Undo/redo
The "undo" button can be used to correct any mistake made while drawing a segmentation. When no edits are made following an "undo", the "redo" button can be used to revert the "undo" action.

Tip
Use the hotkeys Ctrl+Z for "undo" and Ctrl+Y for "redo".
Tools settings
Switch to eraser outside of ROI
Toggle on this option to automatically turn the brush into an eraser when positioned outside an existing ROI. This option works for the brush tool and the threshold tool.
Tip
To turn the brush into an eraser, the center of the brush needs to be outside of an existing ROI and the edges of the brush still need to be in contact with that ROI. If the brush is completely outside of an existing ROI, it will continue acting as a brush.
Manage ROIs
As more ROIs get added to a segmentation, and multiple segmentations get created or loaded in the viewer images and the viewport can become a bit crowded. A few functionalities are available to help users manage ROIs and make the most out of their segmentations.
Change the name of a ROI
To help identify each region of interest, users can enter a name up to 64 characters that can be saved as part of the segmentation. Click on the name of the ROI and type in a new name. Hit "Enter" or click on the check mark to confirm.

Change the color of a ROI
ROIs are represented on the image as "painted" pixels. The color of the ROIs can be changed using the ROI Color picker menu by clicking on the color tag next to the ROI name in the segmentation panel which will change the color of ROI in the panel as well as the associated segmented pixels on the image. The ROI colors can be saved in the DICOM SEG files.

Hide ROIs
The visibility of individual ROIs can be toggled on and off. When the visibility of a ROI is turned off, its pixels cannot be edited and contour and fill are no longer visible on the image. Hidden ROIs can be renamed or deleted. The visibility state of a ROI cannot be saved.

The visibility of all ROIs can also be toggled on off at the segmentation level. Hiding all ROIs in a segmentation hides all ROIs regardless of their individual visibility state. New ROIs can still be created even when the segmentation visibility is turned off.

Lock ROIs
ROIs can be locked to ensure they do not get accidentally modified while segmenting other regions of the image. Pixels from a locked ROI cannot be removed when using any segmentation tool for another ROI over the locked ROI or when using the erase tool. In addition the color or name of locked ROI cannot be modified, and the locked ROI cannot be deleted. The locked state of a ROI cannot be saved.

Delete ROIs
ROIs can be deleted by clicking on the delete icon in the segmentation panel. Deleting an ROI removes all pixels assigned to that ROI and cannot be undone.

ROIs visibility settings
There are a few ROI visibility settings that can be adjusted from the segmentation settings menu:
-
Outline: The outline of ROIs in the active segmentation will be visible when either the "Fill & Outline" or "Outline" option is selected. The outline will be hidden when the "Fill" option is selected. The outline's thickness can be set to a value between 0 (invisible) and 10 for all ROIs in the active segmentation using the Border slider.
-
Fill: The fill of ROIs in the active segmentation will be visible when the either the "Fill & Outline" "Fill" option is selected. The fill will be hidden when the "Outline" option is selected. The fill opacity can be set to a value between 0% (invisible) to 100% solid) for all ROIs in the active segmentation using the Opacity slider.
-
Inactive segmentations: When multiple segmentations are loaded in the viewer simultaneously the visibility of ROIs from inactive segmentations can be toggled on/off. The fill opacity of ROIs in inactive segmentations can be adjusted using the Opacity slider.

ROIs statistics
For each ROI, statistics are available in the segmentation panel upon hovering. Statistics are re-calculated and updated every time a ROI is edited.

- Statistics available for all ROIs and all modalities:
| Name | Description |
|---|---|
Min Value | Minimum pixel intensity value in the ROI with the pixel intensity unit. |
Min Coord | Coordinates of the pixel with the minimum intensity value in the ROI. |
Max Value | Maximum pixel intensity value in the ROI, with the pixel intensity unit. |
Max Coord | Coordinates of the pixel with the maximum intensity value in the ROI. |
Mean Value | Mean pixel intensity value within the ROI, with the pixel intensity unit. |
Standard Deviation | Standard deviation of pixel intensity values within the ROI, with the pixel intensity unit. |
Voxel Count | Number of voxels within the ROI. |
Median | Median pixel intensity value within the ROI, with the pixel intensity unit. |
Skewness | Skewness of the pixel intensity values distribution within the ROI. |
Kurtosis | Kurtosis of the pixel intensity values distribution within the ROI. |
Volume | Volume of the ROI, in mm3. |
Center | Coordinates of the pixel corresponding to the center of the ROI. |
- Statistics available for ROIs on
PTmodality only
| Name | Description |
|---|---|
Peak Value | Highest mean pixel intensity value within a 1cm3 sphere in the ROI, presented in the PET image unit (SUV if converted to SUV, or PET image unit if not converted). |
Peak Coord | Point coordinates of the center of the 1cm sphere with the highest mean pixel intensity value in the ROI. |
Lesion Glycolysis | Volume of the ROI x Mean pixel intensity value within the ROI (presented in mm3 x PET image unit). |
ROI statistics can be exported as a .csv file by clicking Save Segmentation > Download (.csv)

Save segmentations
Each individual segmentation can be saved as a DICOM SEG file. A DICOM SEG file can contain up to 255 ROIs that are identified by their label, color, and their associated pixel data. A segmentation must at least contain one ROI with pixel data in order to be saved. ROIs with no pixel data will not be saved. Users need the Single File Upload/Create permission on the project in order to save segmentations.
From the Save segmentation menu, users can select Save or Save As...:

-
Save: Saves a new version of the active DICOM SEG file. The Save button is disabled if the segmentation has never been saved to a DICOM SEG file or if the active DICOM SEG file was just saved or just loaded and no changes have been made to it (addition/deletion ROIs changes in label, changes in pixels). Hiding or locking ROIs are not considered as changes.
-
Save As...: This option allows to enter a name for the report that is limited to 100 characters. If there is no existing name for the segmentation i.e. the segmentation is being saved for the first time) the name is pre-populated with the Flywheel acquisition name of the image reference series. If there is already a name for the segmentation then it is pre-populated in the Save dialog. Entering a new name creates a new DICOM SEG file.
DICOM SEG files are saved under the same acquisition as their reference image series. When a new version of an existing DICOM SEG file is saved, a version history is available in Flywheel Core.

Download segmentations
Segmentations can be downloaded as DICOM SEG files using the Download option from the Save Segmentation menu. Upon selecting this option, a DICOM SEG file is downloaded to your computer. Users need the Download file permission to the project in order to download segmentations.
Close segmentations
Segmentations can be closed with the Close icon in the segmentation header or with the Close option from the Save Segmentation menu. Closing a segmentation removes the segmentation from the segmentation panel. All ROIs from that segmentation are also removed from the images. If a segmentation has any unsaved ROI changes a prompt is displayed asking if you would like to continue without saving.
